Implementing Server-Side GTM with Docker: On-Premise Solution Guide
Implementing GTM Server-Side on self-hosted infrastructure reduces costs from €50-150/month (Google Cloud) to €5-20/month while ensuring on-premise compliance essential for regulated industries. This technical guide covers complete Docker implementation: container setup, DNS configuration, Caddy reverse proxy with automatic SSL, health checks, zero-downtime deployment, automated backups, and troubleshooting. Solution for IT Managers, DevOps Engineers, and consultants seeking cost-effective, on-premise alternatives to managed cloud solutions.
Introduction
Google Tag Manager Server-Side on Google Cloud Platform typically costs €50-150 per month for medium-high traffic. For many companies, this translates to thousands of Euros per year just for tracking infrastructure.
An alternative exists: implement GTM Server-Side on self-hosted infrastructure. This solution offers:
- Cost reduction: VPS at €5-20/month vs managed cloud
- On-premise compliance: Essential for regulated sectors (banking, healthcare, finance)
- Total control: Zero dependence on rate limits or third-party pricing changes
- Predictable scalability: Fixed costs, no surprises at month’s end
This technical guide shows how to implement GTM Server-Side using Docker on VPS or on-premise servers, with focus on reliability, maintainability, and contained costs.
When this solution makes sense:
- Medium-high traffic (>100k pageviews/month) where GCP costs become significant
- Need to maintain data on-premise for compliance
- IT budget preferring predictable CAPEX over variable OPEX
- Technical team capable of managing Docker infrastructure
Who this guide is for:
- IT Managers evaluating alternatives to managed cloud solutions
- DevOps Engineers implementing on-premise solutions
- Consultants seeking cost-effective options for clients
- Data Engineers responsible for tracking infrastructure
Requirements
This article assumes knowledge of what Google Tag Manager Server-Side is. If not, please refer to Server-Side Tracking Overview. You may also want to review the Tracking Strategy guide for a holistic approach to measurement.
CPU and Memory
Although I haven’t found official documentation on minimum resources, this guide references a Cloud Run instance with 1 vCPU and 500 MB RAM.
My GTM server-side instances, currently at minimum load, are consuming about 200 MB RAM.
So the characteristics mentioned by Google should be adequate.
Clearly, for a high-traffic site, you’ll need more CPU and memory.
In this article I’ll mainly discuss my implementation for this blog, scalability is left to the user. At the end, however, there are observations on the topic.
Docker or Docker Compose
Caddy or a reverse proxy
Tag Manager, Web and Server containers
Subdomain
Initial Setup
Tag Manager Container
To use server-side tagging, create a new Tag Manager server container:
- Click Account > Other actions menu next to the relevant account name
- Choose Create container
- In Target platform, choose Server
- Click Create
During or after creating the Server container, click its ID in the top right (GTM-12345), choose the Manual Provisioning option. A Base64 string similar to this will be shown:
SWYgeW91IGRlY3JpcHRlZCB0aGlzLCBjb21lIGFuZCBzYXkgSGkhIG9uIExpbmtlZGluIDop
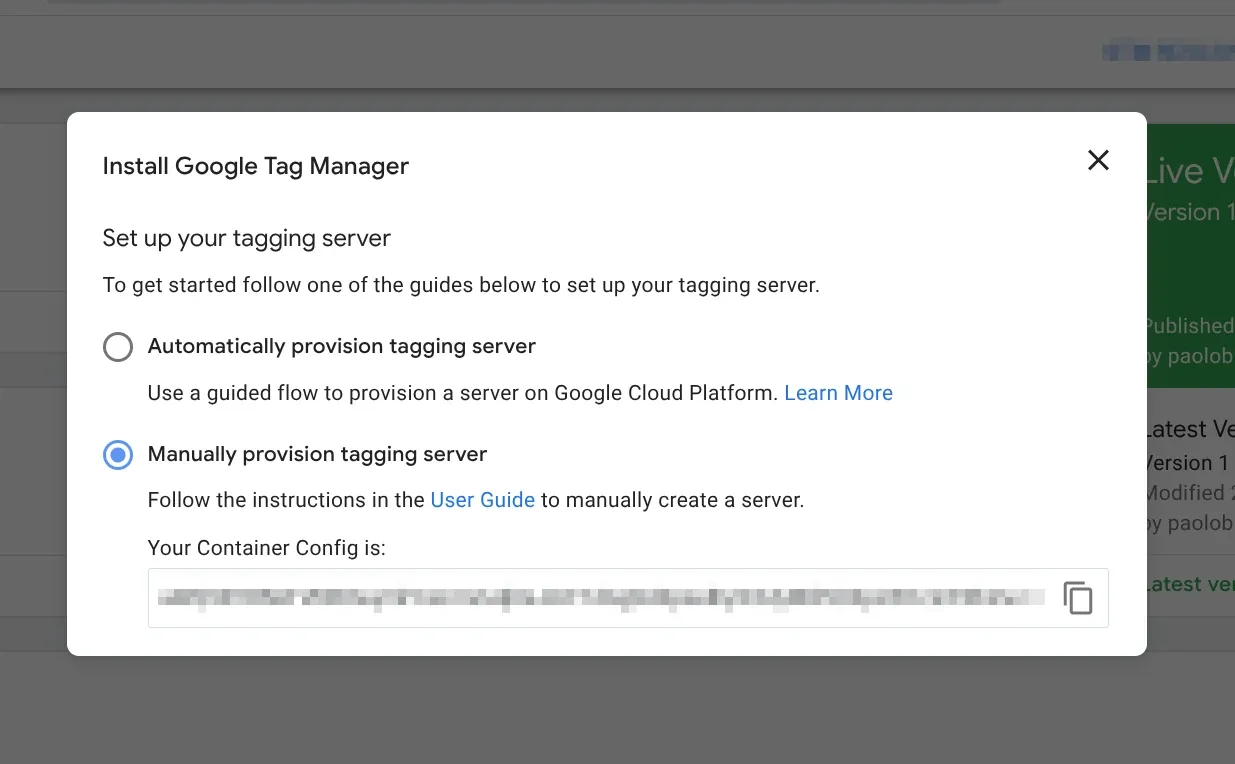
Copy it, we’ll use it later.
This string, when decrypted, returns the following data:
id=GTM-12345
env=1
auth=KqmEMI8P@cwLGh4GF8YMb
These are the container references that will be passed to the Docker image later.
DNS Configuration and Subdomains
For Google Tag Manager Server-Side deployment, we’ll use two subdomains: one that will serve as the endpoint (or destination) for data sent from the Web container, and another used internally to generate the preview.
For this article, we’ll use the fictitious domain ecommerce.comm.
In your DNS manager, create two A records (and AAAA if you use IPv6) pointing to your server’s IP where the record name will be the subdomain you want to use:
| Type | Name | IPv4 | Proxy? |
|---|---|---|---|
| A | sgtm | 203.0.113.0 | No |
| A | sgtm-preview | 203.0.113.0 | No |
💡 HTTPS certificate issuance, if using Caddy, is automatic, otherwise you’ll need to handle this aspect. Tag Manager expects the HTTPS protocol.
For this implementation, you’ll need at least two separate Docker instances:
- Preview server
- Tagging server
Both servers use the same Docker image at gcr.io/cloud-tagging-10302018/gtm-cloud-image:stable.
Docker Implementation
Environment Variables
Create the .env file from which Docker will take variable values during container creation.
In this file we’ll insert the CONTAINER_CONFIG variable, which we found after creating the server container and the PREVIEW_SERVER_URL variable, which is the subdomain for the preview server.
If you’re in a Unix-like environment (Linux or macOS), run from terminal:
echo "IMAGE=gcr.io/cloud-tagging-10302018/gtm-cloud-image:stable" >> .env
echo "CONTAINER_CONFIG=SWYgeW91IGRlY3JpcHRlZCB0aGlzLCBjb21lIGFuZCBzYXkgSGkhIG9uIExpbmtlZGluIDop" >> .env
echo "PREVIEW_SERVER_URL=https://sgtm-preview.ecommerce.comm" >> .env
For Windows (PowerShell) the commands are:
Add-Content .env "IMAGE=gcr.io/cloud-tagging-10302018/gtm-cloud-image:stable"
Add-Content .env "CONTAINER_CONFIG=SWYgeW91IGRlY3JpcHRlZCB0aGlzLCBjb21lIGFuZCBzYXkgSGkhIG9uIExpbmtlZGluIDop"
Add-Content .env "PREVIEW_SERVER_URL=https://sgtm-preview.ecommerce.comm"
Or for Windows (Command Prompt):
echo IMAGE=gcr.io/cloud-tagging-10302018/gtm-cloud-image:stable >> .env
echo CONTAINER_CONFIG=SWYgeW91IGRlY3JpcHRlZCB0aGlzLCBjb21lIGFuZCBzYXkgSGkhIG9uIExpbmtlZGluIDop >> .env
echo PREVIEW_SERVER_URL=https://sgtm-preview.ecommerce.comm >> .env
💡 Values in the
.envfile will be different from those used in this example, except for theIMAGEvariable
Preview Server
In your Docker Compose file, insert the following:
gtm_preview:
  image: ${IMAGE}
  container_name: sgtm-preview
  environment:
    CONTAINER_CONFIG: ${CONTAINER_CONFIG}
    RUN_AS_PREVIEW_SERVER: 'true'
  restart: always
  ports:
    - '127.0.0.1:8082:8080'
Tagging Server
The tagging server cluster is the endpoint to which data is sent and the entry point to the preview server, to which a proxy is executed. In short, requests arriving at the tagging server are redirected to the preview server and routed to other endpoints (Google Ads, GA4, Meta, etc.). The required variables for this server are CONTAINER_CONFIG and PREVIEW_SERVER_URL. Below is the snippet to insert in the Docker Compose file:
gtm_production:
  image: ${IMAGE}
  container_name: sgtm-prod
  environment:
    CONTAINER_CONFIG: ${CONTAINER_CONFIG}
    PREVIEW_SERVER_URL: ${PREVIEW_SERVER_URL}
  restart: always
  ports:
    - '127.0.0.1:8081:8080'
💡 The exposed ports on the host are
8081and8082, you can change them according to your needs. Note how I’m using127.0.0.1for loopback onlocalhost(::1on IPv6). This is useful to not expose these ports to the entire Internet and not open them in the firewall. We’ll use a reverse proxy for this purpose.
After finishing the Docker Compose file configuration, run: docker compose up -d to (re)create and start the containers
Health Check
To check that the containers are online, make two calls to localhost via curl:
curl -i localhost:8081/healthz

HTTP/1.1 200 OK
Content-Type: text/plain
Date: Sat, 24 Oct 1987 12:00:00 GMT
Connection: keep-alive
Keep-Alive: timeout=5
Transfer-Encoding: chunked
curl -i localhost:8082/healthy
HTTP/1.1 200 OK
Content-Type: text/plain
Date: Sun, 16 Sept 1990 12:00:00 GMT
Connection: keep-alive
Keep-Alive: timeout=5
Transfer-Encoding: chunkedYou can also run docker ps to make sure the containers are healthy and running.
| CONTAINER ID | IMAGE | COMMAND | CREATED | STATUS | PORTS | NAMES |
|---|---|---|---|---|---|---|
| cGFvbG8K | gcr.io/cloud-tagging-10302018/gtm-cloud-image:stable | ”/nodejs/bin/node se…” | Ages ago | Up 19 hours (healthy) | 127.0.0.1:8081->8080/tcp | sgtm-prod |
| YmlldG9saW5p | gcr.io/cloud-tagging-10302018/gtm-cloud-image:stable | ”/nodejs/bin/node se…” | Tomorrow | Up 19 hours (healthy) | 127.0.0.1:8082->8080/tcp | sgtm-preview |
💡 The Docker container includes a default health check command,
HEALTHCHECK CMD ["/nodejs/bin/node", "/app/health_checker_bin.js"], which periodically queries the/healthyendpoint.
If you use Docker’s health check, you can modify the settings following the instructions.
Reverse Proxy Configuration
It’s time to expose our containers to the Internet. We’ll use Caddy for this (any other reverse proxy works, as long as TLS/SSL certificates are issued as mentioned).
Caddy Setup
I configured my Caddyfile as follows:
{
        # Email for TLS/SSL certificate issuance via Let's Encrypt
        email server@ecommerce.comm
}

sgtm-preview.ecommerce.comm {
        reverse_proxy localhost:8082 {
                # Pass original request headers to Docker container
                header_up X-Real-IP {remote_host}
                header_up X-Forwarded-For {remote_host}
                header_up X-Forwarded-Proto {scheme}
                header_up Host sgtm-preview.ecommerce.comm

                # Timeout for HTTP connections
                transport http {
                        read_timeout 30s
                        write_timeout 30s
                }
        }

        # Compress HTTP responses using zstd (preferred) or gzip
        # Reduces bandwidth usage and speeds up loading
        encode zstd gzip

        # Save request logs in JSON format
        # Useful for debugging and traffic analysis
        log {
                output file /var/log/caddy/sgtm-preview.log
                format json
        }
}

sgtm.ecommerce.comm {
        reverse_proxy localhost:8081 {
                # Pass original request headers to Docker container
                header_up X-Real-IP {remote_host}
                header_up X-Forwarded-For {remote_host}
                header_up X-Forwarded-Proto {scheme}
                header_up Host sgtm.ecommerce.comm

                # Timeout for HTTP connections
                transport http {
                        read_timeout 30s
                        write_timeout 30s
                }
        }

        # Compress HTTP responses using zstd (preferred) or gzip
        # Reduces bandwidth usage and speeds up loading
        encode zstd gzip

        # Save request logs in JSON format
        # Useful for debugging and traffic analysis
        log {
                output file /var/log/caddy/sgtm-tagging.log
                format json
        }
}
After saving the changes, run this command to format and load the new settings: sudo caddy fmt --overwrite && sudo caddy reload
💡 The configuration file uses some useful directives:
encode: compresses HTTP responses to reduce bandwidth usagelog: logs all requests to JSON files for debugging and monitoringheader_up: passes original headers (IP, host, protocol) to Docker containers
Validation and Testing
Configure Container URL
In Tag Manager, go to the server container. In Admin > Container Settings, enter the tagging server URL (sgtm.ecommerce.comm) in the Server container URL field and click Save.
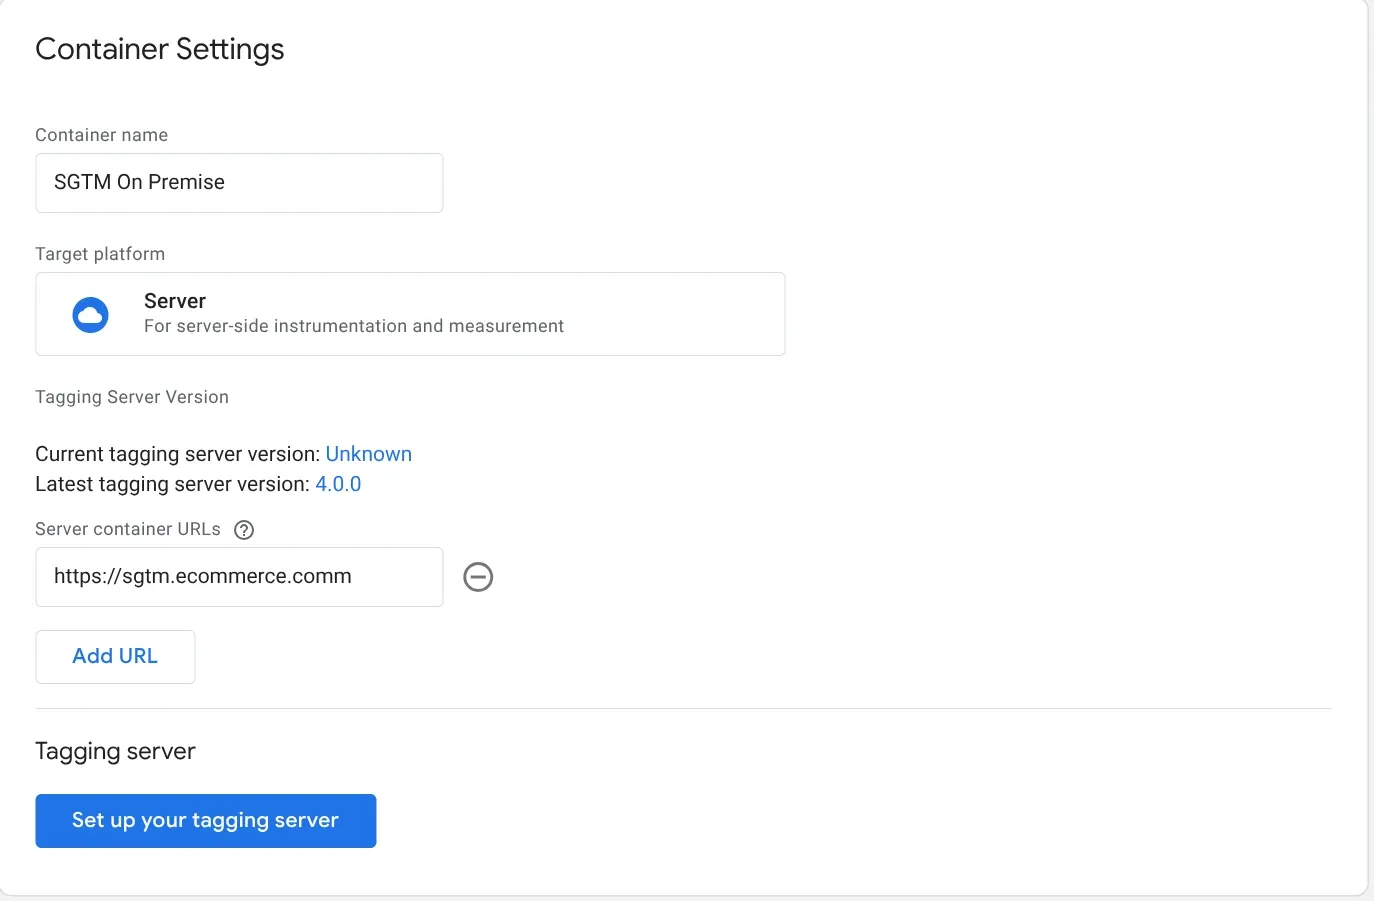
💡 If you’ve mapped multiple subdomains for the tagging server, you’ll need to reverse proxy each of them to the same port on
localhost. Remember to add them in Tag Manager, in the Admin > Container section
Test with Preview Mode
In the Tag Manager workspace, preview the container by clicking Preview and verify that the preview page loads. In another browser tab, navigate to any path in the server container URL. You can manually test a request by clicking the three vertical dots in the top right ⋮ and selecting Send requests manually.
In the terminal, paste the curl command:
curl -H 'x-gtm-server-preview: hdxaG9Y6cXFVvzB9EkZTqmm26Nm4WxhWynRFedYqsECfzUtraIERiquqJjfjzlqaizw=' 'https://sgtm.ecommerce.comm/g/collect?v=2&en=page_view&tid=G-1234&cid=123.456&dl=https%3A%2F%2Fexample.com%2F'If the preview page shows the sent request, then everything is configured correctly.
💡 Make sure the preview page shows the tagging server URL
sgtm.ecommerce.comm
Troubleshooting
Container Won’t Start
Symptom: docker ps doesn’t show containers or status is “Restarting”
Solution:
# Check logs
docker logs sgtm-prod
docker logs sgtm-preview

# Verify environment variables
docker inspect sgtm-prod | grep -A 10 Env
Common causes:
CONTAINER_CONFIGvariable incorrect or missing- Port already in use (change mapping in docker-compose)
- Corrupted image (redo
docker pull)
SSL Certificates Not Issued
Symptom: Browser shows SSL error, Caddy can’t obtain certificates
Solution:
# Check Caddy logs
journalctl -u caddy -f

# Check DNS
dig sgtm.ecommerce.comm
nslookup sgtm.ecommerce.comm
Common causes:
- DNS doesn’t point to correct IP
- Ports 80/443 not open in firewall
- DNS records still propagating (wait 24-48h)
Preview Doesn’t Work
Symptom: Preview mode in GTM doesn’t show requests
Solution:
Verify that the x-gtm-server-preview header is present in the request:
curl -H 'x-gtm-server-preview: YOUR_TOKEN_HERE' \
  'https://sgtm.ecommerce.comm/g/collect?v=2&en=page_view'
Check in Caddy logs that requests arrive:
tail -f /var/log/caddy/sgtm-tagging.log | grep previewCommon causes:
PREVIEW_SERVER_URLincorrectly configured in prod container- Preview container not listening on correct port
- Caddy not correctly passing headers (
header_up)
502 Bad Gateway Error
Symptom: Caddy returns 502, GTM doesn’t respond
Solution:
# Verify containers are up
docker ps

# Test directly on localhost
curl -i localhost:8081/healthz

# Check timeout in Caddy
grep timeout /etc/caddy/Caddyfile
Common causes:
- Container crashed or not started
- Timeout too low in Caddy (increase to 60s if necessary)
- Container overloaded (scale horizontally)
Tags Not Sent to Destinations
Symptom: GTM works but data doesn’t reach GA4/Ads/Meta
Solution:
Verify Web container configuration in GTM:
- Server URL must point to
https://sgtm.ecommerce.comm - Client-side tags must be configured to send to server-side
- Check in GTM Preview that server-side tags fire
Check container logs:
docker logs sgtm-prod | grep errorScalability
The implementation described in this article is designed for blogs and low-to-medium traffic sites. For most cases, a single tagging server and one preview server are more than sufficient.
When to Scale
If your site receives continuous and consistent traffic, you may need to scale horizontally. Google recommends configuring tagging servers as a cluster rather than as a single instance, to ensure better availability and performance.
Important note: each server instance must have at most 1 vCPU. Additional vCPUs are not used and negatively impact automatic scalability. It’s preferable to have 3 instances with 1 vCPU each rather than a single instance with 3 vCPUs.
Clustering Options
To create a tagging server cluster, you have two main options:
- Docker Swarm: simpler to configure, ideal if you’re already using Docker Compose. Allows scaling services with a single command and automatically handles load balancing.
- Kubernetes: more complex but more powerful, recommended for enterprise infrastructures or if you’re already familiar with K8s. Offers advanced orchestration and automatic self-healing.
Whichever solution you choose, remember that each cluster instance must be configured with the same environment variables: CONTAINER_CONFIG and PREVIEW_SERVER_URL must be identical on all nodes.
Preview Server
The preview server doesn’t need to scale. A single instance is sufficient since it’s only used during tag debugging and configuration, not for production traffic.
Load Balancer
If you implement a cluster, you’ll need to configure a load balancer in front of the tagging servers to distribute traffic. Caddy can handle this functionality natively, or you can use nginx, HAProxy, or your cloud provider’s load balancer.
In Docker Swarm, internal load balancing is handled automatically. In Kubernetes, you can use a LoadBalancer type Service or an Ingress Controller.
Beyond the Basics: Same-Origin and Tag Gateway
This self-hosted implementation opens the door to more advanced configurations.
Same-Origin Implementation: once you have complete control over your GTM server, you can configure it to serve the container from the same domain as your site (e.g., ecommerce.comm/gtm instead of sgtm.ecommerce.comm). This approach significantly improves privacy, reduces adblocker issues, and makes tracking virtually indistinguishable from normal site traffic. For a path-based implementation example, see the Google Tag Gateway vs Server-Side GTM comparison guide.
Google Tag Gateway: Google Tag Gateway is a CDN-level reverse proxy that makes Google tag requests load from your own domain — without requiring a server you manage. It only handles Google tag traffic (GA4, Google Ads, gtag.js), but setup takes 5-10 minutes via Cloudflare or GCP. For a detailed comparison of when to use Tag Gateway versus sGTM (or both together), see Google Tag Gateway vs Server-Side GTM.
Total server control makes it possible to implement both approaches — or layer them together for the best of both worlds.
How-to
Updates
When Google Tag Manager notifies of a new container version, you need to update the Docker image.
Basic Procedure
For a standard update with brief service interruption:
docker compose down
docker pull gcr.io/cloud-tagging-10302018/gtm-cloud-image:stable
docker compose up -d
What happens:
docker compose down→ Stops and removes active containersdocker pull→ Downloads latest GTM image versiondocker compose up -d→ Recreates containers with new image
💡 Verify that in your
docker-compose.ymlthe image is exactlygcr.io/cloud-tagging-10302018/gtm-cloud-image:stable, otherwise Docker will use the one defined in the file, ignoring the manual pull.
Automatic Update
To force automatic pull without separate commands:
docker compose up -d --pull alwaysUpdate Verification
Check that the new image is in use:
docker images | grep gtm-cloud-imageVerify containers are healthy:
docker ps
curl -i localhost:8081/healthz
curl -i localhost:8082/healthy
Zero-Downtime Deployment (Optional)
If you can’t afford service interruptions, you have two approaches:
Option 1: Parallel Instances
Define two services in docker-compose.yml:
services:
  gtm_prod_v1:
    image: gcr.io/cloud-tagging-10302018/gtm-cloud-image:stable
    container_name: sgtm-prod-v1
    ports:
      - '127.0.0.1:8081:8080'
    # ... rest of configuration

  gtm_prod_v2:
    image: gcr.io/cloud-tagging-10302018/gtm-cloud-image:stable
    container_name: sgtm-prod-v2
    ports:
      - '127.0.0.1:8083:8080'
    # ... same configuration
Update and start v2:
docker compose pull gtm_prod_v2
docker compose up -d gtm_prod_v2
Test that it works, then switch traffic in Caddy to port 8083. Once verified:
docker compose stop gtm_prod_v1
docker compose rm gtm_prod_v1
Option 2: Blue/Green Deployment
Create two separate compose files (docker-compose.blue.yml and docker-compose.green.yml) and alternate between them:
# Deploy green
docker compose -f docker-compose.green.yml up -d

# Test and switch traffic in Caddy

# Stop blue
docker compose -f docker-compose.blue.yml down
Regular Maintenance
Docker Image Cleanup
Docker accumulates old images over time. To clean unused ones:
# Remove unused images
docker image prune -a

# Complete cleanup (images, containers, volumes, networks)
docker system prune -a
⚠️ Warning:
docker system prune -adeletes EVERYTHING not in use, including custom volumes and networks. Use with caution.
Log Rotation
Caddy logs grow indefinitely. Configure automatic rotation by creating /etc/logrotate.d/caddy:
/var/log/caddy/*.log {
    daily
    rotate 14
    compress
    delaycompress
    notifempty
    missingok
    postrotate
        systemctl reload caddy
    endscript
}
Or clean manually:
# Empty logs while keeping files
truncate -s 0 /var/log/caddy/sgtm-tagging.log
truncate -s 0 /var/log/caddy/sgtm-preview.log
Resource Monitoring
Periodically check resource consumption:
# Real-time container statistics
docker stats

# Docker disk usage
docker system df

# Container logs in real-time
docker logs -f sgtm-prod
If you notice abnormal consumption, check GTM logs in Caddy to identify unexpected traffic.
Backup and Restore
What to Backup
Essential files to save:
# Create backup directory
mkdir -p ~/gtm-backup

# Copy configurations
cp .env ~/gtm-backup/
cp docker-compose.yml ~/gtm-backup/
cp /etc/caddy/Caddyfile ~/gtm-backup/

# Optional: backup recent logs
cp /var/log/caddy/sgtm-*.log ~/gtm-backup/
Automated Backup
Create a script /usr/local/bin/backup-gtm.sh:
#!/bin/bash
BACKUP_DIR="/backup/gtm/$(date +%Y-%m-%d)"
mkdir -p "$BACKUP_DIR"

cp ~/.env "$BACKUP_DIR/"
cp ~/docker-compose.yml "$BACKUP_DIR/"
cp /etc/caddy/Caddyfile "$BACKUP_DIR/"

# Compress and clean backups older than 30 days
tar -czf "$BACKUP_DIR.tar.gz" -C /backup/gtm "$(date +%Y-%m-%d)"
rm -rf "$BACKUP_DIR"
find /backup/gtm -name "*.tar.gz" -mtime +30 -delete
Add to crontab for weekly execution:
crontab -e
# Add: every Sunday at 3:00
0 3 * * 0 /usr/local/bin/backup-gtm.sh
Quick Restore
In case of disaster, restore from backup:
# Restore configuration files
cp ~/gtm-backup/.env ~/
cp ~/gtm-backup/docker-compose.yml ~/
cp ~/gtm-backup/Caddyfile /etc/caddy/

# Recreate containers
docker compose down
docker compose up -d

# Reload Caddy
sudo caddy reload
💡 The
CONTAINER_CONFIGin the.envfile is linked to the GTM container. If you recreate the Server container in Google Tag Manager, you’ll need to update this string.
Load Balancer
When using Google Tag Manager Server-Side (GTM SS) and activating preview mode, the server container takes longer than normal to respond, up to 20 seconds. Preview mode must:
- Establish a continuous connection with the GTM server
- Receive events and logs in real-time
If the CDN or load balancer interrupts the connection too soon, everything breaks.
In Caddy, in the dedicated section, we set the timeout to 30 seconds.
Conclusion
This lengthy and, I hope, comprehensive article is now complete. I wanted to capture everything I learned from this experience.
Among the questions I asked myself most frequently during this implementation, one was: is it really worth it?
The answer, despite initial difficulties, is yes, for several reasons:
Control and resilience: The Internet as we know it is changing. Fewer and fewer companies control more and more infrastructure. Convenient? Yes. But it exposes us to concrete risks, as demonstrated by the AWS and Cloudflare outages mentioned at the beginning. Reducing dependencies on third-party services means having an alternative when others go down.
Knowledge: Complexity pays off with skills that no one can take away from you. In the economy of total delegation, truly understanding how things work under the hood is a rare competitive advantage.
Savings: Initial costs (VPS/On-premise server + time) are quickly amortized. My €5/month VPS runs this site, GTM server-side, and 4-5 other services. Doing the same on Google Cloud? Minimum €50-100/month, plus the risk of sudden increases.
The final satisfaction? Immense, as promised at the beginning.
If you have questions or want to share your implementation, contact me on LinkedIn.
Related Resources
- Google Tag Gateway vs Server-Side GTM - When to use GTG, sGTM, or both together
- Server-Side Tracking Overview - Understand the fundamentals of server-side tagging
- Tracking Strategy: How to Build a Measurement System That Works - Plan your measurement approach before implementing
- GTM Consent Mode V2: Complete Implementation Guide - Essential for GDPR compliance with server-side tagging
- GTM MCP Server: AI-Powered Tag Management - Automate GTM configuration with AI